When you create a turtle with Crayola Color Wonder™ Paints, it’s easy to add texture and blend colors—all with no clean-up!
1.
How can one type of animal have so many different textures all over its body? Look at turtles in books, on TV, on the Internet, or in person. Notice their leathery skin, scaly legs, sharp beaks, and smooth and at times even horny shells.
2.
With a Crayola Color Wonder™ Marker, outline a turtle’s shape on Color Wonder Paper. From above you can see its head, tail, shell, and legs—all simple shapes! Using Color Wonder™ Paint and Markers, texturize your sketch to show the variety of elements. Blend colors. Add dots and spirals to legs and head.
3.
Finish your turtle painting with a decorative border around the edge of the paper. Air-dry the turtle before you display it.
Stick up for sharp-toothed creatures who get a bad rap! They are just trying to survive like all other animals.
What’s at the center of a galaxy? A black hole! Look WAY beyond a black hole by creating a vivid galaxy and observation
Play a fast-paced game that is popular in the Spanish countryside. Paint your own action-filled fun on your playground!
Tissue paper flowers burst out of a chalk-designed two-dimensional vase to create a flowering plant display fit for givi
See flower parts through the eyes of a famous artist! Georgia O'Keeffe's florals are a young botanists' dream.
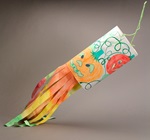
Catch indoor breezes with a colorful windsock! Whether you’re learning about Japan, weather, or aviation, Crayola® Twist
Bring nature's designs indoors with these golden leaf-printed bookmarks. For gifts, make matching picture frames, gift w
Ready to be a fearless explorer? Create a spaceship flying among strange new planets, where stars have no limit!