Create a plate to look like your favorite animal then add Crayola® Dry-Erase Crayons and you’ll have tons of reusable fun.
1.
Use a clear plastic plate to trace two circles on Crayola® Construction Paper. Cut out the circles with Crayola® Scissors. Use a Crayola® Glue Stick to attach one of the circles onto the back of the clear plastic plate.
2.
Cut the center out of the second circle, leaving about a 1 inch (2.54 cm) rim. Glue the rim to the top edge of the plastic plate.
3.
Cut out additional details from the construction paper to create your favorite animal: whiskers, eyes, ears, feathers, etc. Glue these pieces onto the top edge of the plastic plate.
4.
Glue a large craft stick to the back of the plastic plate for a handle. Allow to dry completely before using the handle.
5.
Use Crayola® Dry-Erase Crayons to write on the top side of the plastic plate. Draw pictures or practice math facts, spelling words or colors. Wipe off Dry-Erase Crayons easily with the E-Z Erase Mitt.
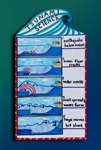
Tsunamis, or gigantic waves, are one of the most destructive natural disasters. Discover how they’re formed, deep under
Travel ancient trade routes! What products were exchanged? Where were the major ports? How did traders cross land? Show