Create light, sparkly snowflakes! Decorate a package, trim a tree, or hang them in winter windows. Let it snow!
1.
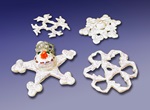
When precipitation falls through atmosphere that is colder than 32°F (0°C), white or translucent ice crystals form. These crystals are called snow. Do you think every snowflake looks different than all the others? Try these steps to create your own unique snowflakes.
2.
Flatten a large chunk of white Model Magic®. Cut out snowflake shapes with large and small cookie cutters. Press the shapes together in layers.
3.
If you like, press mini cookie cutters into the Model Magic layers. Remove these shapes to create lacy snowflakes.
4.
Form Model Magic characters such as elves to decorate the snowflakes.
5.
Decorate with Crayola Super Sparkle Glitter Glue and sparkly chenille sticks. Air-dry before using.
Experiment with paint techniques to create a unique snow scene.
Crayola® Model Magic snowmen demonstrate your understanding of the different physical forms of water.
Design a stark winter landscape with long shadows. Show silhouettes of trees, snowboarders, sleighs, or other winter sce
Explore and respond to the work of Marcel Duchamp, creating a collage of a reworked face.
How can your class become a community of learners? These self-portrait paper dolls encourage everyone to become better f
Library windows are just the place to share reviews of favorite books. Use Crayola® Washable Window Markers or Crayola W
Stick up for sharp-toothed creatures who get a bad rap! They are just trying to survive like all other animals.