Red roses are commonly used to say "I love you." What message will your forever flowers send to their recipient?
1.
Flowers and flowering plants form an exceedingly important part of nature. Their brilliant-colored leaves cover the hillsides during autumn in temperate regions. What common types of flowering plants and trees are found in the region where you live? Are any used as a food for people or animals?
2.
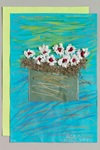
Research some of your favorite flowering plants. How many petals do they have? What kind of leaves do they have? In what colors can they be found? In what parts of the world do they grow and under what conditions? Use your knowledge of these flowers to design a beautiful bouquet in a frame with Crayola Shaper Paper™. Here are some ideas to help you get started.
3.
For your frame, use one sheet of Shaper Paper. With a Crayola Colored Pencil, mark off a 1.75 inch (4.4 cm) border on all sides. Draw straight lines connecting the points. Draw another line to divide this border in half. Mark tabs and corners as shown.
4.
Fold each margin along the outside border toward the center of the paper. Cut out the outer-most rectangle on the edges of the sheet. Cut in 1.75 inches (4.4 cm) on the ends of the long sides so you have a tab on each end. Then fold the sides together on the first border you drew to build your frame.
5.
Cover your craft area with newspaper. Brush a small amount of water on the tabs. Insert tabs into the folded sections and hold for a few seconds until the adhesive is set. Then apply a little water where the frame corners overlap. Pinch corners together w
6.
Sketch accurate sizes, shapes, and numbers of leaves and petals for your flowers. An easy way to reproduce many flowers is to draw one petal, and then place Shaper Paper on top to trace another one. Cut out your flowers, leaves, and curvy stems.
7.
Cover your craft area with newspaper. Paint your frame and plant parts with Crayola Watercolors. Air-dry the paint.
8.
If your flower petals are stacked, wet the bottom of the petals and press them firmly to the petals below. Adhere your flowers to the frame—inside and out—by brushing the backs of the flowers and leaves with a little water. Press them in place for a few s
9.
Curl the damp petals to give them even more dimension. Air-dry your framed flowers before giving them as a gift.
Tissue paper flowers burst out of a chalk-designed two-dimensional vase to create a flowering plant display fit for givi
Create unique gold jewelry with nature's finest leaves. Add Crayola® Model Magic® and gold Premier Tempera for a strikin
What could you do when you were 6 months old? When did you first walk? Make this pop-up record of your growing-up milest
Explore and respond to the work of Marcel Duchamp, creating a collage of a reworked face.
How can your class become a community of learners? These self-portrait paper dolls encourage everyone to become better f
Library windows are just the place to share reviews of favorite books. Use Crayola® Washable Window Markers or Crayola W
Stick up for sharp-toothed creatures who get a bad rap! They are just trying to survive like all other animals.