Make a realistic replica of a Hopi messenger from the spirit world. Incorporate natural objects to explore this traditional art form.
1.
Most native nations honor their spirits with ceremonies, dances, songs, and religious icons. On special occasions, Hopi men dress as friendly supernatural spirits, of whom there about 250. Cottonwood-root carvings of these spirits, made by skilled carvers, are called kachinas. Make authentic-looking replicas of kachina dolls, typically shown in motion, with Crayola Model Magic® compound.
2.
To honor Hopi tradition, research kachinas to get ideas about how they are made and embellished. You may wish to choose an authentic Hopi figure (such as an Owl Kachina, White Buffalo, Eagle Dancer, or a Butterfly Maiden) to try to duplicate. Think about incorporating natural materials such as small sticks, pine needles, feathers, and other items, for a more realistic look.
3.
Begin the kachina by forming an armature. Use Crayola Scissors to cut a recycled cardboard tube into the size you’d like to work with. Roll thin slabs of Model Magic colors for the top and bottom of the carving. Place the slabs around the tube, overlapping the edges into the tube’s ends to hold the sections in place.
4.
Roll out thick coils that match the top color for arms and press them around the back, shaping the coil to look like shoulders and arms. Make sure the arms touch the body or use wire or chenille stems for armatures if the arms are sticking out. To hold posed pieces of compound in position while they dry, use crumpled wax paper.
5.
Add clothing next. To make a skirt that flares away from the legs, make a rectangle large enough to go around the tube and pinch the top edge smaller. Stretch it around the tube and prop it on top of crumpled wax paper until it dries completely.
6.
To make feet, roll two equal-sized balls of modeling compound. Shape the front of the feet smaller. Press feet against the bottom of the legs and flatten. To make the legs look separate, use a modeling tool to press a line of indentation up the center.
7.
Add details such as jewelry, arm bands, or pectoral adornments. Press natural materials into the hands to look like your kachina is holding something.
8.
To make the head, roll a ball (or cover a foam ball) to match the proportions of your kachina and decorate. Press in any feathers before you add details and facial features to the head. Press the completed head on the top of the kachina body. Model Magic®
9.
Embellish your figure with Crayola Squeezables™ 3-D Paints. Air-dry the paint before handling.
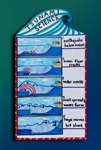
Tsunamis, or gigantic waves, are one of the most destructive natural disasters. Discover how they’re formed, deep under