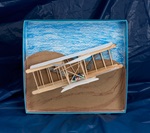
In December 1903, the first controlled airplane flight took place over the dunes near Kitty Hawk, North Carolina. Recreate the Wright brothers’ Flyer and the moment that changed transportation.
1.
How did the Wright Brothers move from a bicycle shop in Dayton, Ohio, to flying a plane over the dunes at Kitty Hawk, North Carolina? Through their hard work and determination, these two brothers did what people dreamed of doing for thousands of years. They flew the first powered, controlled, and sustained airplane flights!
2.
Read a book such as <EM>The Wright Brothers: How They Invented the Airplane</EM>. With Crayola® Colored Pencils, make a list of the successes and failures of these two amazing brothers. Find pictures of their <EM>Flyer</EM>. Then prepare to take off with an art project to document how the Wright brothers’ dogged determination revolutionized travel.
3.
To create the sky, color the inside of a recycled box lid using Crayola Twistables. With Crayola Scissors, cut sandpaper to fit inside the lid to resemble the sandy terrain at Kitty Hawk. Glue it in with Crayola School Glue. Air-dry the background.
4.
Use your imagination to make the wings and body of the Wright brothers’ plane. Here’s one way. Lay two craft sticks parallel to each other. Place four toothpicks across to form a ladder-like piece. Glue together. Repeat this process five more times. Air-dry the frame sections.
5.
Lay two frame sections flat and slightly overlapped to form the back wing. Glue together. Air-dry thoroughly.
6.
Butt two frame sections against the back wing to form the plane’s body. Glue them standing upright in the center with a parallel space between them. Glue them into place. Air-dry thoroughly.
7.
Butt a frame section onto either side of the body. Remember to leave space between the front and back sections. Glue into place. Air-dry thoroughly.
8.
On paper, draw two wings to cover the top and bottom frame sections. Cut them out. Glue the paper wings to the plane’s frame.
9.
Draw and cut out two small, paper wings for the front of the plane and two propellers for the back. Glue in place with toothpicks. Air-dry the plane.
10.
Using Crayola Model Magic, mold a pilot and an engine if you like. Knead color the from Crayola Washable Markers into white Model Magic to create the Model Magic colors you want. Glue on your pilot lying on his belly. Glue the engine to the aircraft. Air-
What high-tech invention is most intriguing? What scientific discovery is truly amazing? Build a replica and discover th
To the rescue on land or sea! Put out the fire! Deliver heavy cargo! Design a 3-D model helicopter and discover how they
Represent the spirit of hope with a classroom display of sunny daffodils. Plant flowering bulbs and learn how communitie
Have you ever been teased at school or picked on by a bully? It’s NOT a good feeling. Help end mean behaviors by startin
In December 1903, the first controlled airplane flight took place over the dunes near Kitty Hawk, North Carolina. Recrea
Wood to make pencils is harvested from forests. Discover how the pencils you use have an environmental impact—and why re
Stop hunting and poaching! Rhinoceroses are an endangered species in Africa. Imagine you are on a nature reserve in Bots
Weave golden sticks through paper printed with gold leaves. This wall hanging is a natural to make an impression!