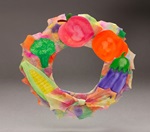
Create a festive fall decoration with 3-D paper sculptures of seasonal fruits and vegetables. Fill your horn of plenty with symbols of local produce for an Earth-friendly display.
1.
What are the colors of the fall harvest? Do you see orange carrots and pumpkins, purple eggplant and grapes, green squash, yellow corn, and red beets? Which crops are grown locally? From where are the others shipped? Rather than use real food as a decoration, create this imaginative paper cornucopia and help save natural resources!
2.
Cover your art area with newspaper. Blend Crayola Fingerpaint to make a rich fall palette or colors. To make the cornucopia, paint one side of a paper plate. Use your fingers to make a basket-weave design. Set it aside to dry.
3.
Cover watercolor papers with an array of autumn harvest colors. Paint all sides of a few lunch bags as well, to become pumpkins or beets. Create texture with your fingers and thumbnail scratches. Make variegated colors for realism. Be prepared to share your decorated paper with classmates.
4.
After the paper plate is dry, flip it over and paint the other side. Again, create a basket-weave design with your fingers. Air-dry your paintings.
5.
To assemble your cornucopia, cut a slit from the edge of the paper plate into its center. Slide one side of the slit under the other to create a cone. Glue the edges. Air-dry the glue.
6.
Tear, cut, roll, and/or crumple your painted papers into familiar fruits and vegetables. Here are a few ideas. To make carrots, roll orange paper into a tight cone. Twist strips of green paper together for leaves. Glue together.
7.
To make beets or pumpkins, stuff recycled paper into painted lunch bags. Twist or tear green or brown papers to form vines and leaves. Scrunch up small bits of paper and glue them together for a bunch of grapes. Roll green or yellow paper into squash shap
8.
To hold your twisted shapes together and give them a polished look, brush them with a glaze of equal parts water and glue. Add Glitter Glue highlights to each paper sculpture. Air-dry the glue.
9.
Assemble your cornucopia filled with nature’s abundance. Present it as a "thank you" gift to a teacher or someone in your family.
Celebrate the fall harvest with decorative ears of Indian corn. Display these handsome ears year after year.
Explore growth cycles through the seasons then create original chalk drawings of pumpkins ready for harvest.
People around the world give thanks for their food. Celebrate a harvest of pineapples, pumpkins, or pomegranates-and sho
Focus on the fall harvest as you use Vincent van Gogh's techniques to create an original drawing with Crayola® Colored P
Harvest celebrations are held in many cultural traditions. Create a colorful fruit and vegetable garland for Sukkot, Tha
Capture nature's spirit by creating a leaf-print picture frame. Gold Crayola® Premier™ Tempera creates a dazzling gift t
Create a festive fall decoration with 3-D paper sculptures of seasonal fruits and vegetables. Fill your horn of plenty w
Capture the warm colors of fall by creating a gorgeous doorknob decoration with Crayola Model Magic®.