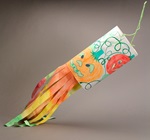
Do you love when warm spring winds start to blow? Design your own decorative kite using no-mess Color Wonder™ Soft Sticks™.
1.
To make a diamond kite, fold Crayola Color Wonder™ Paper in half. About 1/3 from the top, cut or tear off a small triangle away from the fold. Next, cut or tear a long thin triangle toward the bottom of the fold. Open the paper and you have a perfect kite shape. Ask for help from an adult if you need it.
2.
With Color Wonder Soft Sticks™, decorate your kite any way you like. Watch as the colors appear only on the Color Wonder Paper. They’re absolutely no mess! To make flowers, first color several circles on your kite. Add dots around the circles for petals. Make lots of flowers or just one big one. For another look, dab different colors on your kite to create polka dots. Or make stripes—whatever you wish!
3.
Glue your kite on a contrasting paper background. Add yarn and colorful Color Wonder triangles to make a tail. Glue in place. Air-dry the glue before displaying your kite indoors.
Play a fast-paced game that is popular in the Spanish countryside. Paint your own action-filled fun on your playground!
Tissue paper flowers burst out of a chalk-designed two-dimensional vase to create a flowering plant display fit for givi
Catch indoor breezes with a colorful windsock! Whether you’re learning about Japan, weather, or aviation, Crayola® Twist
What does the shadow know? If it’s a shadow across a sundial, it knows the time of day. Experiment with shadows and time
Focus on the fall harvest as you use Vincent van Gogh's techniques to create an original drawing with Crayola® Colored P
The science of leaves, leaf parts, and why leaves change colors leaves an impression on students as they create realisti
Bring on the sun with this decorative paisley kite. Create the luscious look of Art Nouveau with Crayola® Washable Windo
Draw and write about stormy settings, incorporating details about weather safety and how storms occur.